分类 网站 下的文章

每次 WordPress 发布大版本更新时,后台总会推送一个醒目的更新提示框,而且这个提示框无法关闭,看起来十分碍眼。为了去掉这个更新提示,我研究了一种通过修改版本号的方法,非常简单且实用。接下来就详细讲解去掉 WordPress 更新提示以及修改版本号的具体方法。

具体步骤

方法一:通过修改版本号去掉更新提示

  1. 打开文件 /wp-includes/version.php
  2. 找到 $wp_version 变量。
  3. 修改 $wp_version 的值为一个更高的版本号,例如:
    原代码:

    $wp_version = '4.7.0';

    修改后:

    $wp_version = '5.0.0';

这样一来,你不仅修改了版本号,还成功屏蔽了 WordPress 后台的更新提示,一举两得。

注意事项:
虽然此方法简单,但不建议长期使用。尤其是在官方发布重要安全补丁时,请务必及时更新 WordPress,以免因为漏洞被黑客攻击。

方法二:不修改版本号,仅去掉后台更新提示

如果你希望保留当前的版本号,但又想隐藏后台烦人的更新提示框,可以通过以下步骤实现:

  1. 打开文件 wp-admin/includes/update.php
  2. 找到以下代码:

    echo "<div id='update-nag'>$msg</div>";
  3. 将这行代码删除或注释掉。

保存修改后,更新提示将不会再显示,而版本号仍保持原状。

建议

虽然隐藏更新提示可以提升后台的整洁度,但 WordPress 更新往往涉及安全修复,尤其是重大漏洞的补丁。因此,建议定期检查 WordPress 的官方更新内容,并及时进行版本升级,以保证网站的安全性。

去掉 WordPress 更新提示效果

折腾 WordPress 的小伙伴们都知道,一些没有集成去除 /category/ 功能的主题,在每次修改固定链接后,分类链接中会出现一个 /category/ 目录。如果想要去掉分类链接中的 /category/ 目录,可以使用插件。网上也有许多插件可以直接去除(其实很多主题已经内置了这个功能)。但是,今天带来的是纯代码版去掉 /category/,适合那些不喜欢用插件的小伙伴喔。

PHP 代码

// 去除分类 category 的代码
add_action('load-themes.php', 'no_category_base_refresh_rules');
add_action('created_category', 'no_category_base_refresh_rules');
add_action('edited_category', 'no_category_base_refresh_rules');
add_action('delete_category', 'no_category_base_refresh_rules');
function no_category_base_refresh_rules() {
    global $wp_rewrite;
    $wp_rewrite->flush_rules();
}
add_action('init', 'no_category_base_permastruct');
function no_category_base_permastruct() {
    global $wp_rewrite, $wp_version;
    if (version_compare($wp_version, '3.4', '<')) {
        $wp_rewrite->extra_permastructs['category'][0] = '%category%';
    } else {
        $wp_rewrite->extra_permastructs['category']['struct'] = '%category%';
    }
}
add_filter('category_rewrite_rules', 'no_category_base_rewrite_rules');
function no_category_base_rewrite_rules($category_rewrite) {
    $category_rewrite = array();
    $categories = get_categories(array('hide_empty' => false));
    foreach ($categories as $category) {
        $category_nicename = $category->slug;
        if ($category->parent == $category->cat_ID)
            $category->parent = 0;
        elseif ($category->parent != 0)
            $category_nicename = get_category_parents($category->parent, false, '/', true) . $category_nicename;
        $category_rewrite['(' . $category_nicename . ')/(?:feed/)?(feed|rdf|rss|rss2|atom)/?$'] = 'index.php?category_name=$matches[1]&feed=$matches[2]';
        $category_rewrite['(' . $category_nicename . ')/page/?([0-9]{1,})/?$'] = 'index.php?category_name=$matches[1]&paged=$matches[2]';
        $category_rewrite['(' . $category_nicename . ')/?$'] = 'index.php?category_name=$matches[1]';
    }
    global $wp_rewrite;
    $old_category_base = get_option('category_base') ? get_option('category_base') : 'category';
    $old_category_base = trim($old_category_base, '/');
    $category_rewrite[$old_category_base . '/(.*)$'] = 'index.php?category_redirect=$matches[1]';
    return $category_rewrite;
}
add_filter('query_vars', 'no_category_base_query_vars');
function no_category_base_query_vars($public_query_vars) {
    $public_query_vars[] = 'category_redirect';
    return $public_query_vars;
}
add_filter('request', 'no_category_base_request');
function no_category_base_request($query_vars) {
    if (isset($query_vars['category_redirect'])) {
        $catlink = trailingslashit(get_option('home')) . user_trailingslashit($query_vars['category_redirect'], 'category');
        status_header(301);
        header("Location: $catlink");
        exit();
    }
    return $query_vars;
}

将以上代码添加到你当前主题的 functions.php 文件中,紧接在最后一个 ?> 前即可。

无论是安装插件还是使用代码,都可能会出现 404 页面错误,即 %post_id%.html(本站设置的固定链接)的伪静态失效了。这种情况下,只需重新保存一次固定链接设置即可。

前段时间 Namecheap 推出了赛门铁克证书替换计划,可以将 Symantec SSL 证书免费替换为 Comodo SSL。而且新证书是三年的有效期,看起来很划算。上个月我已经把我的 www.ikxin.com 证书换成了科摩多的,今天来给小伙伴们写一篇详细的替换教程。

温馨提醒:

目前阿里云、腾讯云、西部数码等推出的免费 DV SSL 证书正是由 Symantec 颁发。

步骤

准备条件

  • 已经申请过 Symantec SSL 证书(如阿里云、腾讯云、西数申请的免费 SSL)。
  • Namecheap 官网 注册一个账号。

第一步

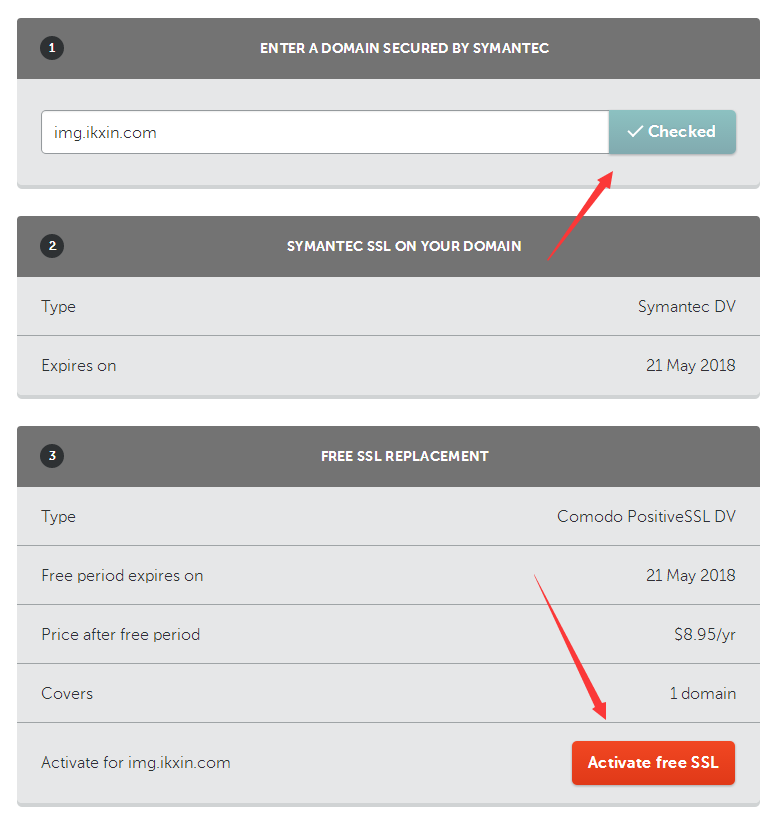
访问 Namecheap Symantec 替换页面 对您已经部署 Symantec SSL 的网址进行检测。本教程使用图床域名作为演示,如下图所示,检测通过后,点击 Activate free SSL 继续下一步。

第一步

第二步

使用在线生成 CSR 工具 ChinaSSL CSR Generator,如下图所示。

第二步

生成之后会有两个文件:一个 CSR 文件和一个 KEY 文件。CSR 文件在申请证书时需要使用,KEY 文件在申请成功后部署 SSL 时需要使用,请务必注意保存好。

第三步

继续回到 Namecheap,提交 CSR 文件,点击下一步,并按照如下截图进行选择。

第三步

第四步

验证域名。可以选择 HTTP 文件验证或 DNS 验证,哪个方便选哪个。本次选择 HTTP 验证。

第四步

第五步

填写公司信息等,必选项用拼音替代填写即可(OPTIONAL 选项可不填)。最下面需要填写接收 SSL 证书的邮箱地址。

第五步

第六步

进行 HTTP 认证,然后等待证书发往您的邮箱即可。

Chevereto 是目前最为强大的 PHP 图床系统,通过它可部署多用户公开或私有的图片存储服务,现在 Chevereto 出了免费的版本,小伙伴可以围观一下 https://github.com/Chevereto/Chevereto-Free

Chevereto 默认提供基于 Apache 环境的伪静态规则,如果服务器是 Nginx 的话,可以使用下面的伪静态规则

location / {
    if (-f $request_filename/index.html){
        rewrite (.*) $1/index.html break;
    }
    if (-f $request_filename/index.php){
        rewrite (.*) $1/index.php;
    }
    if (!-f $request_filename){
        rewrite (.*) /index.php;
    }
    try_files $uri $uri/ /api.php;
}
location /admin {
    try_files $uri /admin/index.php?$args;
}

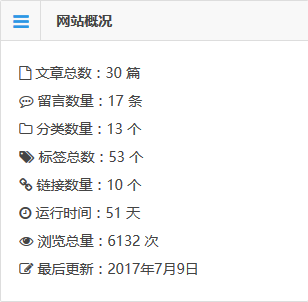
写博客快两个月了,最近想看看这两个月收获了多少浏览量。于是想起了一个网站概括的小工具。这款小工具主题并没有默认集成,需要自行添加。如果你会 PHP,可以直接将其集成到主题中。

下面先放出本站的效果图,供大家参考,CSS 样式也可以自行修改替换。

代码

<ul class="site-profile">
<li><i class="fa fa-file-o"></i> 文章总数:<?php $count_posts = wp_count_posts(); echo $published_posts = $count_posts->publish; ?> 篇</li>
<li><i class="fa fa-commenting-o"></i> 留言数量:<?php global $wpdb; echo $wpdb->get_var("SELECT COUNT(*) FROM $wpdb->comments"); ?> 条</li>
<li><i class="fa fa-folder-o"></i> 分类数量:<?php echo $count_categories = wp_count_terms('category'); ?> 个</li>
<li><i class="fa fa-tags"></i> 标签总数:<?php echo $count_tags = wp_count_terms('post_tag'); ?> 个</li>
<li><i class="fa fa-link"></i> 链接数量:<?php global $wpdb; echo $wpdb->get_var("SELECT COUNT(*) FROM $wpdb->links WHERE link_visible = 'Y'"); ?> 个</li>
<li><i class="fa fa-clock-o"></i> 运行时间:<?php echo floor((time() - strtotime("2007-8-1")) / 86400); ?> 天</li>
<li><i class="fa fa-eye"></i> 浏览总量:<?php echo all_view(); ?> 次</li>
<li><i class="fa fa-pencil-square-o"></i> 最后更新:<?php global $wpdb; $last = $wpdb->get_results("SELECT MAX(post_modified) AS MAX_m FROM $wpdb->posts WHERE (post_type = 'post' OR post_type = 'page') AND (post_status = 'publish' OR post_status = 'private')"); $last = date('Y年n月j日', strtotime($last[0]->MAX_m)); echo $last; ?></li>
</ul>

注意事项

  1. Font Awesome 图标库
    代码中使用了 Font Awesome 图标库中的图标。如果主题已经配置了 Font Awesome,就可以直接显示图标。如果主题未配置,可以安装 Font Awesome 4 Menus 插件解决。
  2. 文本框支持 PHP
    添加小工具时,需要确保文本框支持解析 PHP 代码才能正常使用上述代码。

本站以前一直使用赛门铁克(Symantec)的 SSL 证书,但毕竟是免费的 DV 证书。经过上一次沃通(WoSign)泛滥免费 DV 证书被吊销根证书之后,我也不得不担心有一天赛门铁克也会受到同样的惩罚。

而且根据谷歌官方的消息,Google 将逐渐降低对 Symantec SSL 的信任。所以我决定换一家更受信任的证书签发机构,我选择了科摩多(Comodo)这家老牌提供商。

正好赶上几个月前 Namecheap 推出了赛门铁克证书替换计划,可以将 Symantec SSL 证书免费替换为 Comodo SSL。新证书(Comodo SSL)的到期时间与原证书(Symantec SSL)的到期时间一致,到期后可以选择是否续费。

新证书

下面放上我刚换上的 Comodo SSL 证书截图:

Comodo SSL 证书截图

还有 Comodo SSL 的根证书截图:

Comodo SSL 根证书截图

很多时候,站长们都很关心自己的网站 SEO 做得是否到位,于是我们在查看各种站长工具时,也会想知道哪些爬虫访问过我们的网站,因为这关系到搜索引擎对我们网站的偏好。

因此,我们可以通过查看网站日志来监控蜘蛛的来访情况。今天我要分享的是一段 WordPress 利用 PHP 代码记录蜘蛛来访日志的方式,下面是代码。

// 统计蜘蛛
function get_naps_bot(){
    $useragent = strtolower($_SERVER['HTTP_USER_AGENT']);
    if (strpos($useragent, 'googlebot') !== false) {
        return 'Googlebot';
    }
    if (strpos($useragent, 'msnbot') !== false) {
        return 'MSNbot';
    }
    if (strpos($useragent, 'slurp') !== false) {
        return 'Yahoobot';
    }
    if (strpos($useragent, 'baiduspider') !== false) {
        return 'Baiduspider';
    }
    if (strpos($useragent, 'sohu-search') !== false) {
        return 'Sohubot';
    }
    if (strpos($useragent, 'lycos') !== false) {
        return 'Lycos';
    }
    if (strpos($useragent, 'robozilla') !== false) {
        return 'Robozilla';
    }
    return false;
}

function nowtime(){
    date_default_timezone_set('Asia/Shanghai');
    $date = date("Y-m-d.G:i:s");
    return $date;
}

$searchbot = get_naps_bot();
if ($searchbot) {
    $tlc_thispage = addslashes($_SERVER['HTTP_USER_AGENT']);
    $url = $_SERVER['HTTP_REFERER'];
    $file = "robotslogs.txt";
    $time = nowtime();
    $data = fopen($file, "a");
    $PR = $_SERVER['REQUEST_URI'];
    fwrite($data, "Time: $time robot: $searchbot URL: $tlc_thispage\n page: $PR\r\n");
    fclose($data);
}

注意

在添加代码之前,需要在网站根目录新建一个 txt 文本文件 robotslogs.txt,并将其权限设置为 777。然后访问该文件,就可以看到蜘蛛的来访记录了,十分方便哦。

前不久我写过一篇《WordPress 顶部加载进度条代码》,是用来显示网站加载时间的,和上次的功能类似。

今天我给大家带来的是一个浏览横向进度条,随着网页向下浏览,进度条会逐渐变长。此外,它还支持自定义滚动条颜色。目前本站已经应用了该代码,效果可以直接查看本站页面。下面是代码分享:

HTML 代码

<div id="load"></div>

CSS 代码

#load {
    background-color: #ff6651;
    height: 3px;
    width: 0px;
    position: fixed;
    left: 0px;
    top: 0px;
    z-index: 9999;
}

JS 代码

$(function() {
    function scroll_fn() {
        let document_height = $(document).height();
        let scroll_so_far = $(window).scrollTop();
        let window_height = $(window).height();
        let max_scroll = document_height - window_height;
        let scroll_percentage = scroll_so_far / (max_scroll / 100);
        $('#load').width(scroll_percentage + '%');
    }
    $(window).scroll(function() {
        scroll_fn();
    });
    $(window).resize(function() {
        scroll_fn();
    });
});

注意:HTML 代码需要放在 body 标签下的第一行。

前几天我写过一篇《纯 PHP 代码生成 XML 站点地图》,是用来生成 XML 站点地图的。可是 XML 站点地图看起来都是代码,没有一点美感,因为这本来就是生成给搜索引擎蜘蛛看的。

今天我给大家带来的是 HTML 站点地图,这才算是给人看的 Sitemap 站点地图,只需要新建一个页面即可,简单方便。废话不多说,下面发代码。

PHP 代码

新建一个 sitemap.php 文件,将以下代码写入该文件:

<?php
/**
@package WordPress
Template Name: 站点地图
*/
?>
<!DOCTYPE html PUBLIC "-//W3C//DTD XHTML 1.0 Transitional//EN" "http://www.w3.org/TR/xhtml1/DTD/xhtml1-transitional.dtd">
<html xmlns="http://www.w3.org/1999/xhtml">
<head profile="http://gmpg.org/xfn/11">
    <meta http-equiv="Content-Type" content="text/html; charset=<?php bloginfo( 'charset' ); ?>" />
    <title>站点地图 - <?php bloginfo('name'); ?></title>
    <link rel="canonical" href="<?php echo get_permalink(); ?>" />
    <style type="text/css">
        body {
            font-size: 14px;
            margin: 0;
            color: #000000;
            background: rgba(255, 0, 0, 0);
            background-image: url("https://www.ikxin.com/wp-content/uploads/beijing.png");
        }
        img {
            border: 0;
        }
        a {
            color: #0000ff;
        }
        li {
            margin-top: 8px;
        }
        .page {
            padding: 4px;
            border-top: 1px #EEEEEE solid;
        }
        .author {
            background-color: #EEEEFF;
            padding: 6px;
            border-top: 1px #ddddee solid;
        }
        #nav, #content, #footer {
            padding: 16px;
            border: 4px solid #0000ff;
            clear: both;
            width: 80%;
            margin: auto;
            margin-top: 16px;
        }
    </style>
</head>
<body vlink="#333333" link="#333333">
    <h2 style="text-align: center; margin-top: 20px"><?php bloginfo('name'); ?> 的网站地图</h2>
    <center></center>
    <div id="nav">
        <a href="<?php bloginfo('url'); ?>/"><strong><?php bloginfo('name'); ?></strong></a> &raquo; 
        <a href="<?php echo get_permalink(); ?>">站点地图</a>
    </div>
    <div id="content">
        <h3>文章</h3>
        <ul>
        <?php
            $previous_year = $year = 0;
            $previous_month = $month = 0;
            $ul_open = false;
            $myposts = get_posts('numberposts=-1&orderby=post_date&order=DESC');
            foreach($myposts as $post) :
        ?>
        <li><a href="<?php the_permalink(); ?>" title="<?php the_title(); ?>" target="_blank"><?php the_title(); ?></a></li>
        <?php endforeach; ?>
        </ul>
    </div>
    <div id="content">
        <li class="categories">分类
            <ul>
                <?php wp_list_categories('title_li='); ?>
            </ul>
        </li>
    </div>
    <div id="content">
        <li class="categories">页面</li>
        <?php wp_page_menu( $args ); ?>
    </div>
    <div id="footer">网站首页: 
        <strong>
            <a href="<?php bloginfo('url'); ?>/"><?php bloginfo('name'); ?></a>
        </strong>
    </div>
    <br />
    <center>
        <div style="text-align: center; font-size: 11px">
            最后更新:<?php $last = $wpdb->get_results("SELECT MAX(post_modified) AS MAX_m FROM $wpdb->posts WHERE (post_type = 'post' OR post_type = 'page') AND (post_status = 'publish' OR post_status = 'private')");$last = date('Y-m-d G:i:s', strtotime($last[0]->MAX_m));echo $last; ?><br /><br />
        </div>
    </center>
    <center>
        <div style="text-align: center; font-size: 11px">作者:<strong>
            <a href="https://www.ikxin.com/php-code-html-sitemap.html" target="_blank">夜色静好</a></strong>&nbsp;
            <a href="<?php bloginfo('url');?>/" style="cursor: help"><?php bloginfo('name');?></a> &copy; 版权所有<br /><br />
        </div>
    </center>
</body>
</html>

使用教程

sitemap.php 上传到主题目录,然后新建一个页面,在页面属性 - 模板选择“站点地图”即可,无需填写任何内容。

Typecho 是由国人开发的一套非常优秀的博客系统,代码短小,简单友好,最近也有个项目是用 Typecho 搭建的,理所当然的对该程序有了一点探讨,最大的问题还是伪静态方面,官方没有给出 IIS 和 Nginx 的伪静态规则,还得我折腾老半天去搜索资料,还要测试兼容性,所幸忙了许久还是有收获的,下面我就发上各种 Web 服务器搭建 Typecho 的伪静态规则,省的大家麻烦去找。

Apache

<IfModule mod_rewrite.c>
RewriteEngine On
RewriteBase /
RewriteCond %{REQUEST_FILENAME} !-f
RewriteCond %{REQUEST_FILENAME} !-d
RewriteRule ^(.*)$ index.php [L,E=PATH_INFO:$1]
</IfModule>

Nginx

if (!-e $request_filename) {
    rewrite ^(.*)$ /index.php$1 last;
}

IIS

[ISAPI_Rewrite]
CacheClockRate 3600
RepeatLimit 32
RewriteRule /tag/(.*) /index\.php\?tag=$1
RewriteRule /sitemap.xml /sitemap.xml [L]
RewriteRule /favicon.ico /favicon.ico [L]
RewriteRule /(.*).html /index.php/$1.html [L]
RewriteRule /(.*)/comment /index.php/$1/comment [L]
RewriteRule /category/(.*) /index.php/category/$1 [L]
RewriteRule /page/(.*) /index.php/page/$1 [L]
RewriteRule /search/(.*) /index.php/search/$1 [L]
RewriteRule /feed/(.*) /index.php/feed/$1 [L]
RewriteRule /2(.*) /index.php/2$1 [L]
RewriteRule /action(.*) /index.php/action$1 [L]

规则是根据正式版 1.1 写的,如果有什么问题可以在下方评论提出。

站点地图可以方便网站管理员告诉搜索引擎它的网站上有哪些可供抓取的网页链接。最简单的站点地图形式,就是 sitemap.xml 文件,在其中列出网站中的网址以及关于每个网址的其他元数据(如上次更新的时间、更改的频率以及相对于网站上其他网址的重要程度),以便搜索引擎可以更加智能地抓取网站。

对于 WordPress 生成 sitemap.xml 地图,国内已经有人写了专门的插件,比如较为知名的柳城的 Baidu Sitemap Generator,国外的有 Google XML Sitemaps

不过,我感觉仅仅为了生成一个 sitemap.xml 文件就使用插件会显得有点浪费资源,所以就用代码实现吧!代码是从网上找到的,我稍作修改后,支持生成标签和分类的 XML,并增加了 sitemap.xml 生成时间。

PHP 代码

新建一个 sitemap.php 文件,将以下代码写入该文件:

<?php
require('./wp-blog-header.php');
header("Content-type: text/xml");
header('HTTP/1.1 200 OK');
$posts_to_show = 1000;
echo '<?xml version="1.0" encoding="UTF-8"?>';
echo '<urlset xmlns="http://www.sitemaps.org/schemas/sitemap/0.9" xmlns:mobile="http://www.baidu.com/schemas/sitemap-mobile/1/">';
?>
<!-- 生成时间 <?php echo $showtime = date("Y-m-d H:i:s"); ?> -->
<url>
    <loc><?php echo get_home_url(); ?></loc>
    <lastmod><?php $ltime = get_lastpostmodified(GMT); $ltime = gmdate('Y-m-d\TH:i:s+00:00', strtotime($ltime)); echo $ltime; ?></lastmod>
    <changefreq>daily</changefreq>
    <priority>1.0</priority>
</url>
<?php
// 文章
$myposts = get_posts("numberposts=" . $posts_to_show);
foreach ($myposts as $post) { ?>
<url>
    <loc><?php the_permalink(); ?></loc>
    <lastmod><?php the_time('c'); ?></lastmod>
    <changefreq>weekly</changefreq>
    <priority>0.8</priority>
</url>
<?php } ?>
<?php
// 页面
$mypages = get_pages();
if (count($mypages) > 0) {
    foreach ($mypages as $page) { ?>
<url>
    <loc><?php echo get_page_link($page->ID); ?></loc>
    <lastmod><?php echo str_replace(" ", "T", get_page($page->ID)->post_modified); ?>+00:00</lastmod>
    <changefreq>weekly</changefreq>
    <priority>0.6</priority>
</url>
<?php }} ?>
<?php
// 分类
$terms = get_terms('category', 'orderby=name&hide_empty=0');
$count = count($terms);
if ($count > 0) {
    foreach ($terms as $term) { ?>
<url>
    <loc><?php echo get_term_link($term, $term->slug); ?></loc>
    <changefreq>weekly</changefreq>
    <priority>0.4</priority>
</url>
<?php }} ?>
<?php
// 标签
$tags = get_terms("post_tag");
foreach ($tags as $key => $tag) {
    $link = get_term_link(intval($tag->term_id), "post_tag");
    if (is_wp_error($link)) return false;
    $tags[$key]->link = $link;
?>
<url>
    <loc><?php echo $link; ?></loc>
    <changefreq>weekly</changefreq>
    <priority>0.2</priority>
</url>
<?php } ?>
</urlset>

sitemap.php 上传到网站根目录,然后访问查看效果。

伪静态方案

Nginx

编辑已存在的 Nginx 伪静态规则,新增如下规则后重启 Nginx 即可:

rewrite ^/sitemap.xml$ /sitemap.php last;

Apache

编辑网站根目录的 .htaccess 文件,加入如下规则:

RewriteRule ^(sitemap)\.xml$ $1.php

纯静态方案

Linux 定时任务 + wget 定时生成 sitemap.xml(该方案适合 VPS 用户,不适用于虚拟主机)

将网站根目录的 sitemap.php 重命名为一个只有自己知道的 PHP 文件,比如 xml.php

然后用 Linux 定时任务执行以下命令,将数据保存为 sitemap.xml,存放到网站根目录即可:

wget -O /home/www/www.ikxin.com/sitemap.xml https://www.ikxin.com/sitemap.php
  • https://www.ikxin.com/sitemap.php 是 PHP 的路径。
  • /home/www/www.ikxin.com/sitemap.xml 是 XML 文件存放路径。

这样一来,就解决了 sitemap.xml 是动态数据的问题了。

WordPress 开启 CDN 静态缓存页面之后,当访问文章的时候,便不会去请求源站,而是返回 CDN 缓存了的页面,所以统计文章的浏览数量不会进行自增以及其他的变化。

想要解决这个问题,可以通过 Ajax 来异步请求服务器,然后再进行文章的浏览数量自增或其他的操作。

重要提醒:

本方法仅适用于使用了 WP-PostViews 插件或者与 WP-PostViews 相同字段的博客。若你的文章统计字段不同,可自行修改下方 SQL 语句以达到效果。

解决方案

首先,在 WordPress 的根目录新建一个 PHP 文件,命名为 views.php,然后将以下代码写进该文件:

<?php require('wp-blog-header.php'); ?>
<?php
  $ajaxHead =  $_SERVER['HTTP_X_REQUESTED_WITH'];
  if (strtoupper($ajaxHead) == strtoupper("XMLHttpRequest")) {
    $post_id = $_POST['post_id'];
    echo $post_id;
    $sql = "update wp_postmeta set meta_value = meta_value + 1 where post_id = '${post_id}' AND meta_key = 'views';";
    $wpdb->query($sql);
  } else {
    header("HTTP/2 404 Not Found");
    header("Status: 404 Not Found");
    exit;
  }
?>

在上述代码中,为了防止恶意请求,做了一个 Ajax 请求头的验证,验证是否为 XMLHttpRequest 请求。如果不是,则返回 404 状态。

接下来,在主题的 page.php 文件插入以下 JS 代码:

<script>
  $(function() {
    $.post("/views.php", { post_id: <?php the_ID(); ?> }, function() {});
  });
</script>

这样就可以完美解决 WordPress 开启 CDN 缓存之后文章浏览量无法增加的问题了。